7 Secrets to Photographing Your Porcelain Doll Collection Like a Pro

You've just acquired a stunning bisque doll from the 1920s—her painted features are immaculate, her mohair wig still holds its original curls, and the lace on her dress hasn't yellowed a bit. You want to share her with fellow collectors online, but your photos come out flat, washed out, or sporting weird shadows across her face. Sound familiar? Every collector hits this wall eventually. Great doll photography isn't about expensive gear—it's about understanding how light interacts with porcelain, fabric, and glass eyes. Whether you're documenting your collection for insurance, selling a piece, or simply sharing with a Facebook group of fellow enthusiasts, the right techniques make all the difference between a snapshot and a portrait that captures your doll's true character.
Why Do My Doll Photos Always Look Flat and Lifeless?
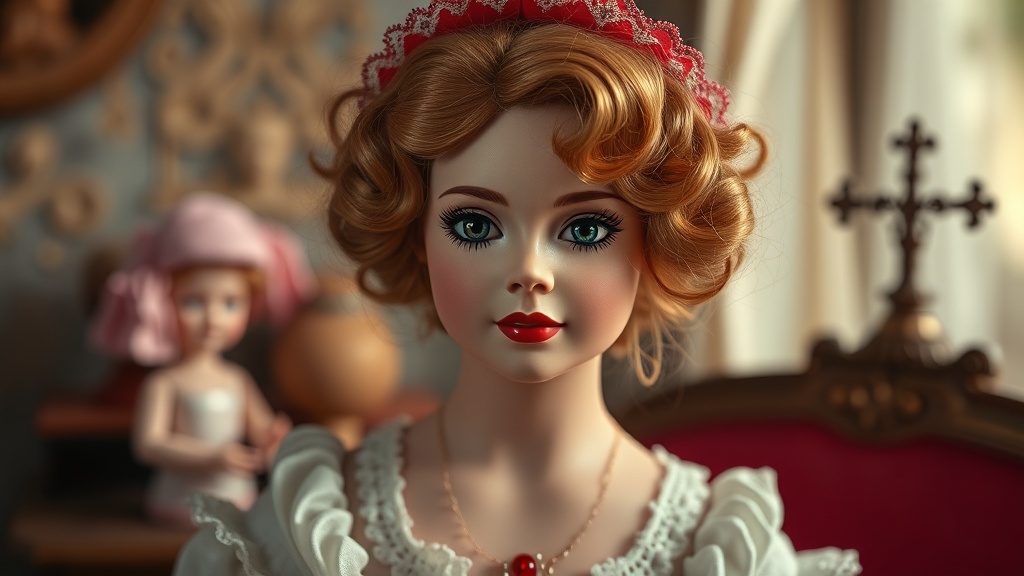
The biggest mistake collectors make is treating their dolls like static objects rather than subjects with personality. Porcelain has a unique luminosity—it's not glossy like plastic, but it's not matte either. That semi-translucent quality that makes bisque so captivating in person becomes a liability under harsh lighting.
Natural window light is your best friend, but not direct sunlight. Position your doll about three feet from a large window during mid-morning or late afternoon. The diffused light wraps around those curved cheeks and painted lips, creating gentle shadows that give dimension. If the light is too direct, hang a white sheet or use a diffuser—professional photographers swear by this trick, and it costs almost nothing.
Here's something most guides won't tell you: angle matters more than equipment. Shooting slightly below eye level gives your doll presence and authority. Shooting from above—what most people do by default—makes even regal dolls look diminished and toy-like. Get down to their level. Yes, it means sitting on the floor sometimes, but that's where the magic happens.
What's the Best Background for Doll Photography?
Busy backgrounds murder doll photos. That floral wallpaper or cluttered bookshelf behind your subject competes for attention and tricks your camera's auto-exposure into making poor decisions. You want your doll's face to be the first thing viewers see—not the lamp in the corner or the pattern on your sofa.
Neutral doesn't mean boring. A piece of unbleached muslin fabric creates warmth without distraction. Slate gray poster board adds sophistication for modern collectible dolls. For antique dolls, consider deep burgundy or forest green velvet—the richness complements their historical character without overwhelming it.
Distance matters too. Place your background material at least two feet behind the doll, then use your camera's portrait mode or a wide aperture (low f-number if you're using a DSLR). This creates that creamy blur—bokeh—that separates your subject from the backdrop. Even smartphone cameras can achieve this effect with portrait mode and proper distance.
How Can I Capture Fine Details Without Harsh Shadows?
Magnifying the intricate hand-painting on a doll's face or the microscopic stitching on vintage clothing requires getting close—but close-up photography creates problems. Your camera blocks ambient light, casting a shadow. The flash blows out delicate features. The autofocus hunts endlessly, never quite locking on.
The solution is a simple reflector. You don't need professional equipment—a piece of white foam board from the craft store works perfectly. Position it opposite your light source to bounce illumination back into shadowed areas. For extreme close-ups of maker's marks or signature details, consider a small LED ring light that attaches to your phone. These cost under $20 and provide even, shadowless lighting that reveals every brushstroke.
When photographing eyes—the windows to the doll's soul, as any collector will tell you—angle your light to create catchlights. Those small white reflections of light source in the eyes are what separate dead-eyed photos from portraits that seem to gaze back at you. One large catchlight at the 10 or 2 o'clock position looks natural; multiple small reflections make eyes look glassy and artificial.
Should I Use Props or Photograph Dolls Alone?
This divides the collecting community, and honestly—both approaches work depending on your goal. Catalog-style photos against clean backgrounds serve documentation and insurance purposes. But contextual shots with period-appropriate accessories tell stories and drive engagement on social platforms.
If you're using props, apply the three-object rule: your doll plus two supporting elements maximum. A Victorian doll with a porcelain teacup and a leather-bound book feels curated. Add a fourth prop—a lace fan, a dried rose, a calling card—and the scene becomes cluttered, the narrative confused. Each element should reinforce the doll's era and character.
Scale is non-negotiable. That beautiful antique chair you found at a flea market might look perfect—but if it's dollhouse scale rather than doll scale, the proportions will nag at viewers subconsciously. Measure twice, photograph once. For reference, most antique bisque dolls range from 12 to 28 inches, so furniture scaled for 18-inch American Girl dolls often works well for larger porcelain pieces.
How Do I Photograph Dolls with Dark Complexions or Clothing?
Cameras—both phone and professional—are optimized for middle-gray tones. Dark brown bisque, black Victorian mourning dresses, or deep navy sailor suits challenge exposure meters. The camera sees all that darkness and tries to brighten it, resulting in muddy grays and lost detail.
Manual exposure compensation is your lifeline here. On most smartphones, tap the subject and slide your finger up or down to adjust brightness. On the exposure scale, dial down by about two-thirds of a stop for dark dolls. This preserves the richness of the original tones while still revealing texture and detail.
Consider the Smithsonian's doll collection documentation standards—they photograph dark objects against mid-tone gray rather than white or black backgrounds. This gives the camera a balanced reference point and prevents the extreme contrast that crushes shadow detail. For your own collection, a medium gray poster board behind dark dolls yields consistently better results than pure white.
What Settings Should I Use for Indoor Doll Photography?
If you're shooting with a camera that offers manual control (and you should, even if it's just your phone's pro mode), prioritize stability over everything else. Porcelain photography demands sharpness—you want to see the crackling in antique glaze, the individual hairs in a mohair wig, the weave of silk ribbons.
Use the lowest ISO setting your lighting allows—100 or 200. Higher ISO introduces noise, which looks like grain in film photography and destroys fine detail. If this means longer exposure times, use a tripod or rest your camera on a stack of books. Even slight camera shake turns crisp features into soft suggestions.
White balance confuses many collectors. Indoor lighting—whether incandescent, LED, or fluorescent—casts color tints that make your dolls look sickly or unnaturally orange. Most cameras auto-correct this, but they guess wrong surprisingly often. Take a test shot of a white piece of paper under your lighting conditions, then use your camera's custom white balance setting to neutralize color casts. Your dolls' painted complexions will look natural rather than jaundiced or frigid.
How Can I Build a Simple Photo Setup That Doesn't Take Over My House?
Not everyone has a dedicated studio space, and doll collectors definitely don't have spare square footage—their shelves are already overflowing. The good news is that professional-quality doll photography requires about the same footprint as a card table.
Create a collapsible setup using a tri-fold presentation board (the kind students use for science fairs). Cover the center panel with your background material of choice. The side panels become adjustable reflectors and flagging to control light spill. When finished shooting, fold it flat and slide it behind a bookshelf. Total cost: under $15.
For lighting, two adjustable desk lamps with daylight-balanced LED bulbs provide consistent, flicker-free illumination. Position one as your key light at 45 degrees to the doll, and the other as fill on the opposite side at lower intensity. If you're serious about documentation, the Library of Congress conservation photography guidelines offer excellent principles for accurate color reproduction and detail preservation.
Finally, establish a consistent workflow. Photograph the full doll, then face detail, then any maker's marks or special features, then interesting accessories. This systematic approach ensures you never get home from a doll show and realize you forgot to photograph the one critical detail that determines authenticity. Memory cards are cheap—take more photos than you think you need. You can always delete; you can't recreate a moment with perfect lighting.
Great doll photography is part technical skill, part artistic vision, and part patience. The dolls themselves have survived decades—sometimes centuries—waiting for someone to appreciate them. Spending an extra ten minutes on lighting and composition honors that endurance. Your collection deserves to be seen at its best, and with these techniques, it will be.