Safely Cleaning Decades of Dust from Your Porcelain Doll Collection

Most damage to antique porcelain dolls happens not from neglect—but from well-meaning owners using the wrong cleaning methods. A single drop of water seeping into a hairline crack can lift paint. A cotton swab rubbed too hard can leave permanent scratches in century-old bisque. If you've acquired vintage dolls at estate sales or inherited a collection that's been sitting in an attic for decades, you're probably staring at layers of dust and wondering where to even begin. This post covers safe cleaning techniques for porcelain doll faces, bodies, clothing, and wigs—plus the warning signs that tell you to put down the cleaning cloth and call a professional.
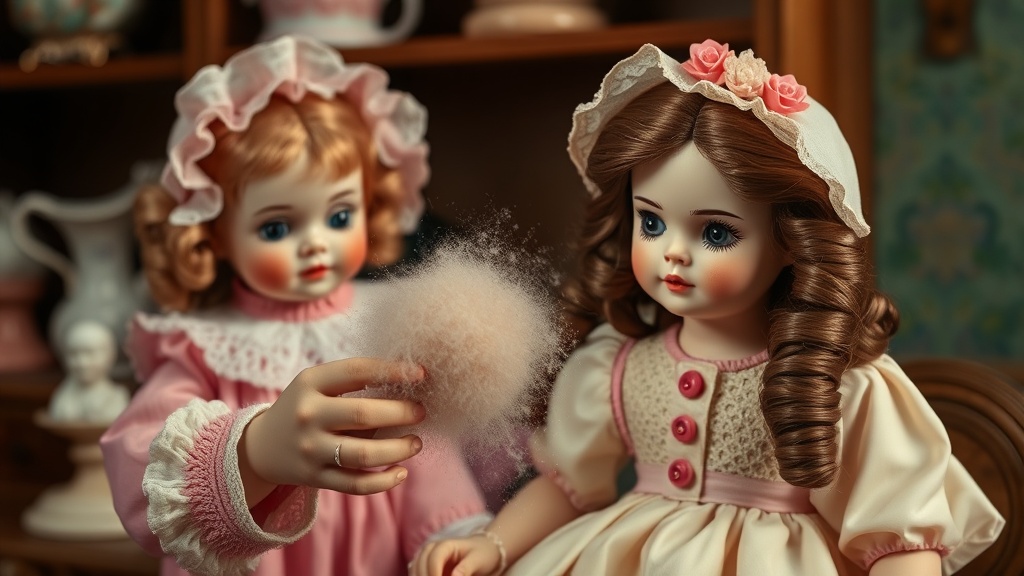
What's the safest way to clean porcelain doll faces without damaging the paint?
Start with the least invasive method: dry cleaning. You'll need soft cosmetic brushes—think natural hair makeup brushes that have never seen product. A large powder brush works for cheeks and foreheads, while a small crease brush handles eye sockets and the tiny spaces around molded curls. Hold the doll face-down over a white cloth (white so you can see what you're removing) and gently sweep the brush in one direction. Don't scrub back and forth—that grinding motion is what embeds dust particles into soft paint.
For dolls with greasy grime or nicotine staining (common in pieces from smoking households), you'll need to escalate—but cautiously. Distilled water is your only option here. Tap water contains minerals that leave white spots on bisque when they dry. Moisten—not soak—a cotton swab or microfiber cloth and test it on an inconspicuous area first: the back of the neck, inside the ear, or under the hairline. Wait twenty-four hours. If the paint looks unchanged, you can proceed.
Work in small sections. Dab gently; don't wipe. Think of it as blotting lipstick, not washing a dish. The Smithsonian's conservation guidelines emphasize that mechanical action (rubbing) causes more damage than the cleaning solution itself. For stubborn spots, a tiny amount of diluted mild soap—something pH-neutral like Ivory or Orvus—can help. Rinse by going over the same area with a cloth dampened only with distilled water. Then dry immediately with a soft towel. Never leave moisture sitting on porcelain.
Doll eyes—whether glass, paperweight, or painted—require special attention. Glass eyes can be cleaned with a slightly damp cotton swab, but never let moisture seep into the socket. Paperweight eyes (those with a dome of clear material over an painted iris) are particularly sensitive; clean only the surface and watch for clouding that might indicate moisture trapped inside. Original painted eyes on china dolls should rarely be touched at all—a soft brush is the most aggressive tool you should use. Eyelashes, if original, are incredibly fragile. Clean around them, not through them.
One mistake collectors make is reaching for magic erasers or silver polish on stubborn marks. Don't. Those products are abrasive and will strip the patina that gives antique dolls their character. You're not trying to make a hundred-year-old doll look factory-fresh—that destroys value. You're aiming for clean, stable, and honest to its age. If you encounter wax residue (sometimes used in old repairs), mineral spirits on a cotton swab can dissolve it, but work in a ventilated area and test first. Some original finishes are shellac-based and will also dissolve.
How do you remove decades of dust from delicate doll clothing and wigs?
Doll clothing from the Victorian era through the 1950s often features silk, wool, cotton, and early synthetic fibers that are brittle with age. The same rule applies here: dry methods first. A vacuum with a brush attachment and the suction turned low can lift surface dust. Place a piece of nylon stocking over the vacuum hose secured with a rubber band—this acts as a barrier so you don't accidentally inhale loose beads, buttons, or fragments of disintegrating fabric.
For woven fabrics that can handle moisture (sturdy cottons and linens), wet cleaning is possible—but with caveats. Test for colorfastness by dampening a white cloth and pressing it against an interior seam. If dye transfers, stop immediately. Antique dyes are unpredictable, and water can cause silk to shatter or wool to felt. When in doubt, consult a textile conservator. The National Park Service's textile conservation guidelines recommend documenting everything before wet cleaning—photograph the garment from multiple angles so you have a record of its condition.
If wet cleaning seems safe, use a bath of cool distilled water and pH-neutral soap. Support the garment fully—don't let heavy wet fabric hang from thin shoulder seams. Rinse thoroughly and dry flat on a clean towel, reshaping as it dries. Never hang antique doll clothes to dry; the weight of the water will distort the shape permanently.
Don't forget the accessories. Leather shoes from the 19th century are often brittle and may crumble if handled roughly. Clean them with a dry soft cloth only. Fabric shoes can be treated like clothing, but they're often glued together rather than sewn—the adhesive may be water-soluble after a century of aging. Test carefully. Metal jewelry should be assessed for verdigris (that green copper corrosion) which can stain porcelain if it transfers. Remove jewelry before cleaning the doll if possible, or place a barrier cloth between the metal and the skin.
Human hair and mohair wigs present their own challenges. Never submerge them. Instead, create a "dry shampoo" using cornstarch or arrowroot powder. Sprinkle it lightly through the hair, let it sit for thirty minutes to absorb oils, then brush it out with a soft natural-bristle brush. For synthetic wigs (common from the 1950s onward), a mixture of cool distilled water and a drop of mild shampoo can be applied with a spray bottle—lightly mist, don't drench. Comb through gently with a wide-tooth comb and allow to air dry on a wig stand.
When should you stop cleaning and call a professional restorer?
There's a difference between surface cleaning and restoration—and knowing where that line sits can save you thousands of dollars in accidental damage. If you encounter any of the following, put down your supplies and step back: active flaking paint, mold or mildew growth, visible cracks in the porcelain that weren't obvious when dry, or previous repairs that are yellowing or lifting. These conditions require specialized knowledge and materials that home collectors shouldn't attempt to source.
Professional doll restorers have access to conservation-grade adhesives, inpainting materials, and cleaning solvents that aren't available at craft stores. They also understand the historical context of different manufacturers. A restorer who specializes in French Bébé dolls knows that Jumeau used specific paint compositions that respond differently to cleaning than the paints used by German manufacturers like Kestner. The Theriault's auction house, which handles some of the finest doll collections in the world, recommends establishing relationships with restorers before you need them—attend doll shows, ask for portfolios, and verify that any professional you hire understands your specific type of doll.
Another red flag: if the doll has provenance or significant monetary value. Cleaning a $50 flea market find is one thing. Attempting to clean a mint-condition Bru Bébé that might be worth several thousand is another. In those cases, even dusting should be done with the doll sealed in a display case—let the next owner or a professional handle anything more invasive. The Doll Reference website maintains a directory of specialists by region and era of expertise.
What supplies should every collector keep on hand for routine maintenance?
Prevention beats intervention every time. The best cleaning is the cleaning you don't have to do because you've protected the doll properly. Still, dust settles. Keep a dedicated kit: soft natural-hair makeup brushes in various sizes, lint-free microfiber cloths (the kind used for eyeglasses), distilled water in a spray bottle, cotton swabs (unbleached, if possible), a bulb blower (like those used for camera lenses), and archival-quality storage materials.
Store your cleaning supplies separately from household cleaners. You don't want residue from glass cleaner or bleach transferring onto your doll cloths. Consider keeping everything in a sealed plastic box labeled specifically for doll care. Replace your brushes every year or two—bristles degrade and can scratch delicate surfaces when they become rough. And never use the same brush on metal parts (like joint mechanisms) that you use on porcelain; metal particles can embed in the bristles and scratch paint.
For collectors in humid climates, silica gel packets (the kind that come in shoe boxes, but archival-grade) are worth keeping in your cleaning kit. Refresh them regularly according to manufacturer instructions. A small digital hygrometer placed in your doll cabinet helps you monitor conditions—aim for 45-55% relative humidity. Too dry, and wood and leather crack; too humid, and mold grows.
Display matters too. Dolls kept in closed cabinets with glass doors accumulate dust at one-tenth the rate of open-shelf displays. If you must use open shelving, rotate which dolls sit at the front—they take the brunt of household dust and cooking oils. Every six months, do a visual inspection. Catching problems early—like a small stain before it sets or a loose wig before it falls off—means less aggressive cleaning later. Take photos during these inspections so you can track changes over time.
Remember that porcelain dolls are composite objects. The porcelain head might be fine with a gentle wipe-down while the cloth body underneath harbors mold, or the leather arms have dried out and started cracking. Always assess the whole doll, not just the parts that show. The cloth body affects the head—acid migration from deteriorating fabric can damage the porcelain over time. Document your cleaning—note what you did, what products you used, and the date. Future owners (or future you) will appreciate knowing the history of intervention.